
Did you ever think that you could build a computer for gaming and save money? Yes, you can; today, we will be doing just that to turn your old computer into a gaming PC. I have had this computer for about 6 years now, and it has held up really well over the years. By refurbishing an older PC, you help the environment and create an excellent gaming machine at low prices. If you do your research right, you should be able to find PC parts that aren’t being used anymore or have been outdated by newer technology, allowing them to drop very low in price while still running like they are brand new.
The best way to get started on this search is by using google with specific keywords like “refurbished computer,” “refurbished computer parts,” “refurbished computer system,” and “system refurbished.” This should provide you with many keywords to use when searching for your next gaming tower, or you can get one of the prebuilt gaming PC under 700 that might save you some time instead of just working on your old PC.
I was fortunate that I had an ancient computer that required upgrading some time back, so all the parts were already there waiting to be used again! I can now play games like Dirt 3 at almost complete settings without breaking into the minimum number of frames per second. Well, let’s not waste any more time and get started on building this bad boy!
Removing Extra PC Components
The first thing you want to do is remove all the extra components on the PC that aren’t needed in this build, such as DVD drives, floppy drives, or anything else that you don’t think you will need. From here, I was able to get my tower down to a tiny cube-style case that would still house all of the necessary parts for this build. That’s what we want from our new tower to save money and space at the same time!
Now What? Well, it’s pretty simple actually, now comes the most challenging part of this project which is choosing your details for building a cheap gaming pc. I decided on AMD/ATI-based products for obvious reasons as they are usually cheaper than their counterpart Intel benchmarks. If you have any questions regarding compatibility between these products, please don’t hesitate to ask in the comment section below; I’ll try to answer them ASAP with some research!.
Before listing out parts for this build, I want to tell you that I went with a cheaper hard drive to obtain more money for the gaming video card. You can pick whatever storage device you’d like, but I chose this one because it had enough space to run my operating system and store some of my favorite games on the side.
Get The Required Hardware For Your PC
Motherboard: Asus M4A78-EM AMD 790GX ATX Motherboard
Processor: Intel Pentium G630 Sandy Bridge Dual-Core 3.3 GHz LGA 1155 65W BX80623G630 Desktop Processor Intel HD Graphics 2000 – BX80623G630 Processors
Video Card: Sapphire AMD Radeon HD 7770 GHz Edition 1GB GDDR5 PCI Express 3.0 x16 HDCP Ready CrossFireX Support Video Card 11241-00-20G
Memory: GSKILL Ripjaws Series 4GB (2 x 2GB) 240-Pin DDR3 SDRAM DDR3 1333 (PC3 10666) Desktop Memory Model F3-10666CL9D-4GBRM
Hard Drive: Western Digital Caviar Blue 1TB 5400 RPM 32MB Cache SATA 6.0Gb/s 3.5″ Internal Hard Drive -Bare Drive
Case: Fractal Design Define R3 Mid Tower Silent Computer Case Matte Black FD-CA-DEF-R3-BK
Optical Drive: Asus 24x DVD±RW SATA Internal Optical Drive Model DRW-24B1ST/BLK/B/AS – Bulk
Power Supply: SeaSonic X Series X650 Gold 650W 80 PLUS GOLD Certified Full Modular Active PFC Power Supply S12II650G – Retail
Operating System: Free (Windows 7) I already had this set up on my old computer, so it didn’t cost anything extra for me to install. If you have to purchase an operating system, there are many great ones out there to choose from. I would recommend looking into Windows 7 or Windows 8 as they are very user-friendly and have many available games for them through online sources.
Best Gaming PC
 | System: Intel Core i5-10400F 2.9GHz 6-Core, Intel B460 Chipset, 8GB DDR4, 500GB PCI-E NVMe SSD, & Genuine Windows 10 Home 64-bit | 9.2 |
Assembling Your Old PC For Gaming
Now that you’ve gathered all your parts for building this gaming pc, it’s time to start putting everything together! Make sure to run the wires for your fan controllers as well if you’re using one before putting your case back on top. The easiest way to do this is by taking the tiny screws that came with the motherboard (if they were not already on) and running them through their proper holes in the backplate. After doing this, put the standoffs onto these screws and tighten them down to hold the motherboard securely. Once this is done, you can take the screws and place them back into your case, where they usually go. From here, you’ll want to install your motherboard into the patient by lining up those standoffs with their appropriate holes, just like before. Screw-in all of these standoffs into the proper holes so that nothing moves around anymore after this point!
Now it’s time to hook everything up! You should be familiar with plugging in power cables at this point, but for anyone not sure how to do this, I’ve provided a picture below of what each thread does.
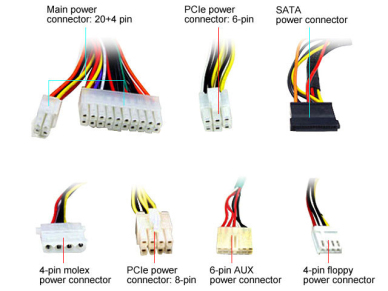
Do not forget about installing any additional fan controllers or headers for fans. If I had extra ports, I would have hooked an LED light strip onto my tower here as well, but since I didn’t have one (or enough room), I decided to leave it out of the build. Also, don’t forget about your PCI-E power cables for your video card. These can be confusing at first, as there are usually two different connections (6 and 8 pins). The 6 pin connector is used when plugging into an older version of PCI express. In this case, you would want to take the 6 pin connector off and run that cable to your motherboard for power since we’re only using an 8 pin connection for the video card.
When everything else has been plugged in, ensure that everything still powers on properly and works fine! At this point, you should be able to fire up Windows if you have it installed, and everything should run properly. If you are not sure or don’t trust the hardware to work at this point, I would suggest reinstalling Windows again from scratch since some components may need drivers or updates to work correctly.
BIOS and Other Settings
Now that your computer is up and running, there are a few things left to do before starting to overclock it just yet! Namely, setting up the BIOS on your motherboard for maximum speed! This section is going to be written for my board, but all of them will be pretty similar in terms of how they’re laid out:
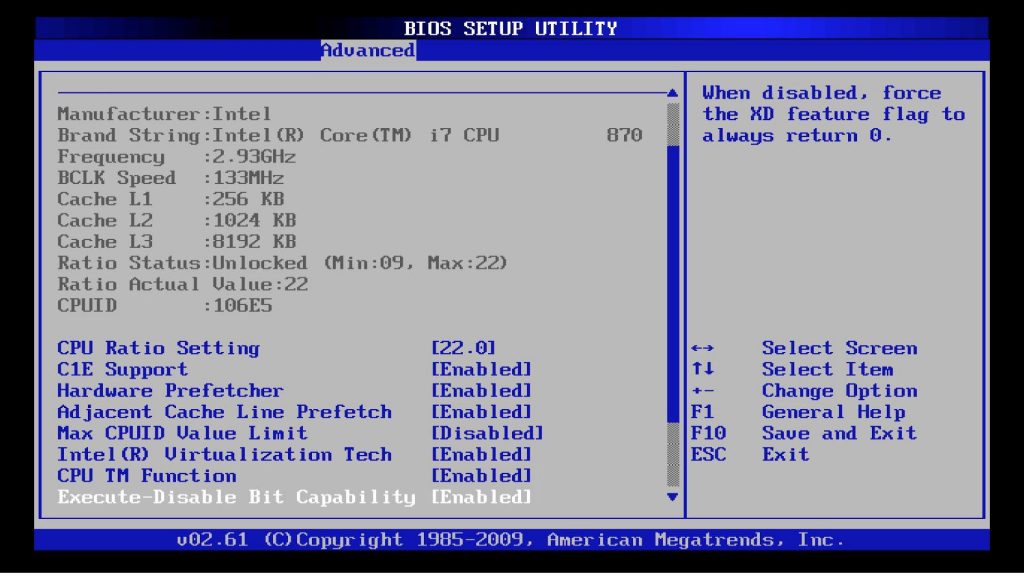
When you first boot up into the BIOS interface, you’ll likely see something like mine below. You can go to the menu tab on the top of the screen and select the “overclocking” image for more choices.
The first option we’re going to set is the language setting of your BIOS. After setting up all your basic options (language, date/time, etc.), it’s time to get into the overclocking section! It’s also at this point where you might want to enable XMP (eXtreme Memory Profile) if your RAM supports it. This makes overclocking much easier as it will go through a predefined list of memory timing adjustments based on which XMP profile you set. To do this, navigate to the Advanced tab and switch over to the Peripherals menu. Once there, you’ll want to change XMP mode from “Disabled” to “Enabled,” and then click apply at the top right corner of your screen:
Next, we’re going to go into the Advanced CPU Settings section. This will take you through a few different menus, but the first thing you should do is make sure that C states are set to enabled. This will prevent your CPU from going into a lower power state when idle, which can adversely affect performance!
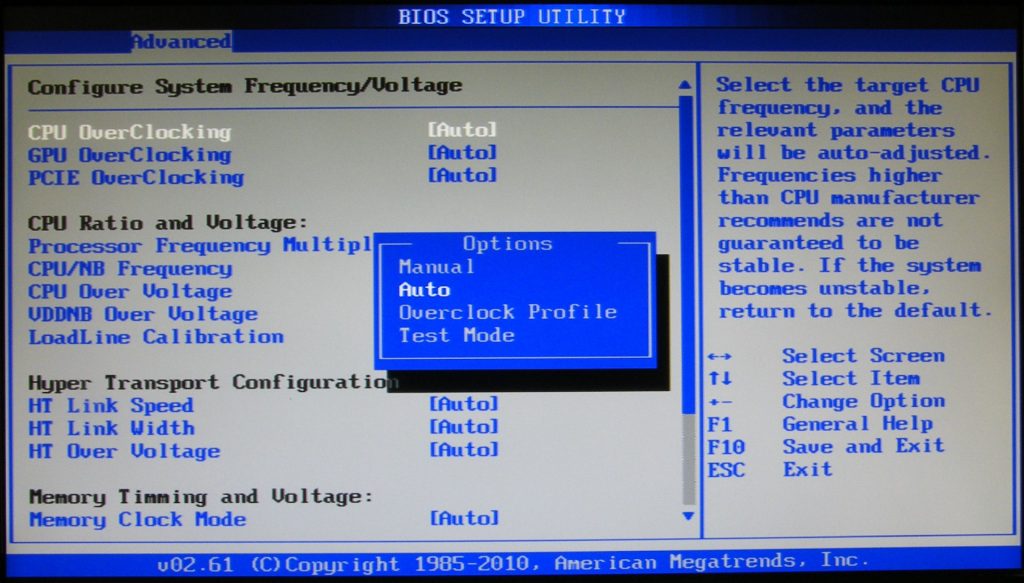
Now it’s time for the fun part! We’re now going to start overclocking our computer by adjusting many of its settings to run faster than before. In this section, I will go over what the different options do and how they affect your computer’s performance. If you want to get a more detailed list of what each setting will act like, then I would recommend checking out this video from LinusTechTips:
Under this menu, we’re basically just changing the ratios for our CPU at which it runs its cores. Personally, I decided to go with a 4.3GHz clock speed because I am not planning to do any really intensive work on my computer that would require more power. If you plan to run programs like Adobe Premiere Pro or other graphically intense games, I would suggest bumping these up a little bit higher so that all of your cores can be used! Also, notice in the picture below where it says “CAS Latency.”
This is the number of clock cycles that your RAM takes to read/write something. I’ve noticed a pretty big performance boost when dropping this down to get my computer’s RAM working more efficiently!
Once you have all of these settings unlocked, you can then adjust individual voltages and timings for each core individually. To do this, we’ll go into the menu tab at the top left and select “CPU Core,” which will take us right into our CPU settings:
Here are all the different options available to adjust within your CPU cores’ settings:
FSB (Front Side Bus) Multiplier Overclocking – The FSB multiplier mainly affects how many cores in your CPU will be running at their full speed. For example, my processor supports a base clock of 100MHz x 45, which equals 4.5GHz when fully overclocked (100MHz x 46 = 4.6GHz). There is also the option to adjust this by setting the multiplier to either “Auto” or “Manual.” In most cases, you will want it set to manual for maximum performance!
EPU Power Saving – EPU stands for energy efficiency performance and basically limits your CPU’s power consumption based on what application it’s running. This can significantly affect battery life if you’re using a laptop, so if you are planning on gaming on the go, I’d suggest turning this off for maximum performance.
Intel Turbo Boost Technology – This technology uses the two additional processor cores within your Intel Core i5 or i7 to automatically increase its clock speed whenever it can. I recommend leaving this on to see if it helps any, but in most cases, you will probably want to leave this off as it’s great for saving battery life, but not so much for getting the absolute best performance.
SpeedStep – A protection mechanism that automatically adjusts the power consumption of your core based on how busy it is running programs. This can help save a fair amount of energy when combined with EPU, but again I’d suggest turning this off if you’re planning on gaming at maximum settings. It would be acceptable to just have it on for everyday computing, though!
CPU Cores – This option will allow you to choose which of your core’s you will be overclocking. I’d recommend leaving “All” unlocked and just adjusting the settings in the menu to speed up each individual core!
Unlocked Multiplier Overclocking – For those with a K-series processor, this allows you to manually adjust the clock multiplier for your CPU!
Multiplier Overclocking – One final setting for overclockers is the option to alter your CPU’s clock multiplier manually. The stock speeds are set at 45X by default (100MHz x 45 = 4500MHz), so if you want something higher, change this to something higher like 46X or 47X.
Core Voltage Overclocking – I recommend leaving this one alone because it can seriously mess up your PC and cause you some big problems! If you really want to, just leave it on “Auto” and don’t change anything here!
Core Current Limit Overclocking – This is basically the max number of Amps (Amperes) that will be running through your CPU when running at full speed. If you decide to change this setting, do so carefully, as adding too much current can damage or even kill your processor!
Conclusion
This was all about turning your old pc into a gaming pc. If you have any queries, then feel free to ask me in the comment section.
This article was helpful for you; if yes, please share this on different social sites like Facebook, WhatsApp, Hike, BBM, WeChat, Instagram, Line, Viber, Pinterest, etc. You can also provide your feedback below in the comment section or contact us directly through our website and help others by sharing your knowledge. Stay connected with us to get more updates on making pc faster, protecting the computer from viruses, internet security tips, and many more. Don’t forget to Like us on Facebook. Thanks for reading How To Turn An Old PC Into A Gaming PC :)!
Martin Mcgaha is working as a blogger since 2015 and has experience in SEO and internet marketing. He also running many successful blogs.
What an excellent article. Thanks for sharing this informative article.
After looking over a handful of the articles on your web page, I truly appreciate your way of writing a blog.
I added it to my bookmark website list and will be checking back in the near future. Take a look at my website too and tell me what you think.
What a great article, well explained thanks a lot for this wonderful post.